Physical Address
304 North Cardinal St.
Dorchester Center, MA 02124
Physical Address
304 North Cardinal St.
Dorchester Center, MA 02124


Asana is an amazing task and project management tool. The easiest way to use Asana is to generate tasks from your email. It can save you time and simplify task creation, particularly if you’re not connected to your Asana workspace or just want a quick way to add tasks.
To email a task to Asana, write an email with the subject line as the task name, and the body as the description, then email it to x@mail.asana.com.
Today, we’ll discuss how to email a task to Asana, How to email a task to Asana from Gmail/Slack/Outlook and some additional email task-creation tips. step-by-step.


Before we move on to the “how”, let’s take a look at how it’s helpful to make tasks in Asana by email:
Easy Task Creating: Email makes it easy to create tasks quickly without logging into Asana by yourself. You can easily add items to your Asana projects by being on the go, in a meeting, or simply not wanting to step outside your inbox.
Centralized Workflow: If you work in an email-based environment, chances are that the majority of your work comes from emails in your inbox. Sending work by email to Asana streamlines your workflow so you are not distracted and hopping between different apps.
Include Relevant Information On Autopilot: Your email subject becomes the task title, and the email body becomes the task description. It’s like having the most relevant information in the Task immediately without copying and pasting it.
No Need For Different Tools: If you’re doing projects through email and task management with Asana, it can be a great combination to have both tools at your disposal. It’s no longer required to copy and paste email content into Asana—email tasks convert automatically into Asana tasks.
Flexibility: On your phone, tablet, or laptop, you can add tasks to Asana directly from your email app, and you can create tasks no matter where you are.
Read more: “Motion vs Asana: Which Task & Project Management Tool is Better?”
It is particularly helpful if you’re travelling or want to snap tasks without accessing Asana. But first, learn how your Asana account is organized:
Projects: Each workspace has projects where work is done. Every project has a separate email address to which you can send emails.
Workspaces: Asana supports multiple workspaces with a single email address. Each workspace is an isolated space with its own projects and teams.
This is a complete, step-by-step guide via email on how to create a new task in Asana.
This is particularly helpful if you’re sharing workspaces under the same email. Asana’s workspace can contain multiple projects and tasks, and emails can be sent to specific projects in each workspace. Below is how you can set up email forwarding for Asana in the context of creating several workspaces in a single email:
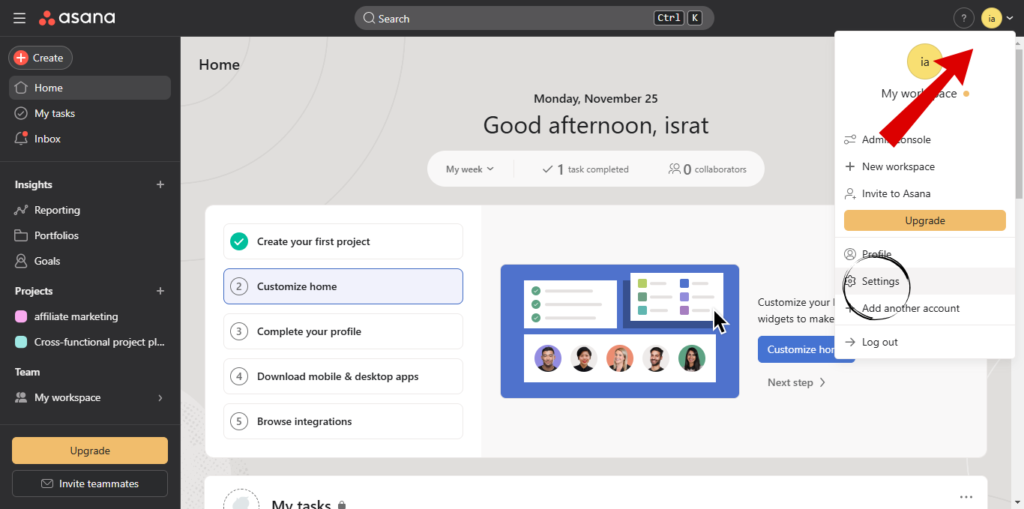
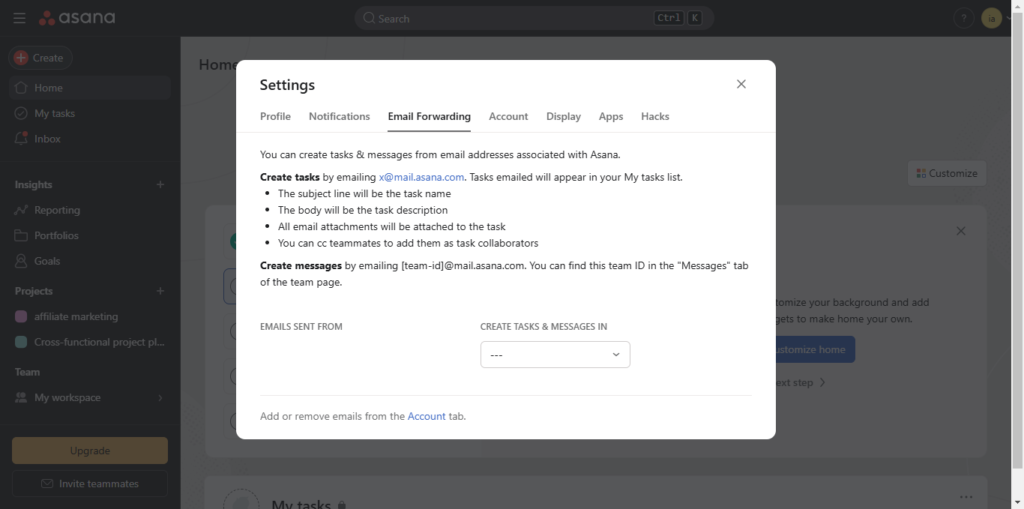
Click on the Profile button in the bottom right corner. Then, choose Settings; you’ll see an “Email forwarding section” and click on it.


Here, you can find your email in the “EMAILS SENT FROM” section, and under the drop-down menu in the “CREATE TASKS & MESSAGES IN” section, you will find the workspaces for that email.
If you have multiple workspaces under the same email, select the workspace from the dropdown box where you would like to send a task via email. This ensures that the task is pushed to the correct workspace.
Now that you’ve got the email forwarding set correctly start writing your email. When you’re creating a task with your email in Asana, you need to specify your email subject line because your email subject line will be the task name in Asana, so it should be brief and descriptive.
This is how Asana will convert your email into a task, Just follow these steps, and Asana will generate a task directly from your email:
Please keep in mind that your email should be less than 30MB.
Once your email is prepared, email it to x@mail.asana.com.
Note: Do not change the email address. This address belongs to your Asana project, so any modifications will prevent the task from being generated.
After sending the email, Asana will generate a new task within your chosen project. The subject will be transformed into the task title, and the body of your email will be converted into the task description.
After you’ve sent the email, go to Asana and open the project where the Task was created. You should see the Task as the subject and the email body as the task description.
At this point, you can:
If you frequently need to build tasks out of emails, you can create automation using a platform such as Zapier or Microsoft Power Automate. These tools can auto-send emails to Asana’s email address when they receive a trigger — such as an email with certain keywords or a specific sender.
Asana assigns a project a specific email address. Here’s how you can find it:
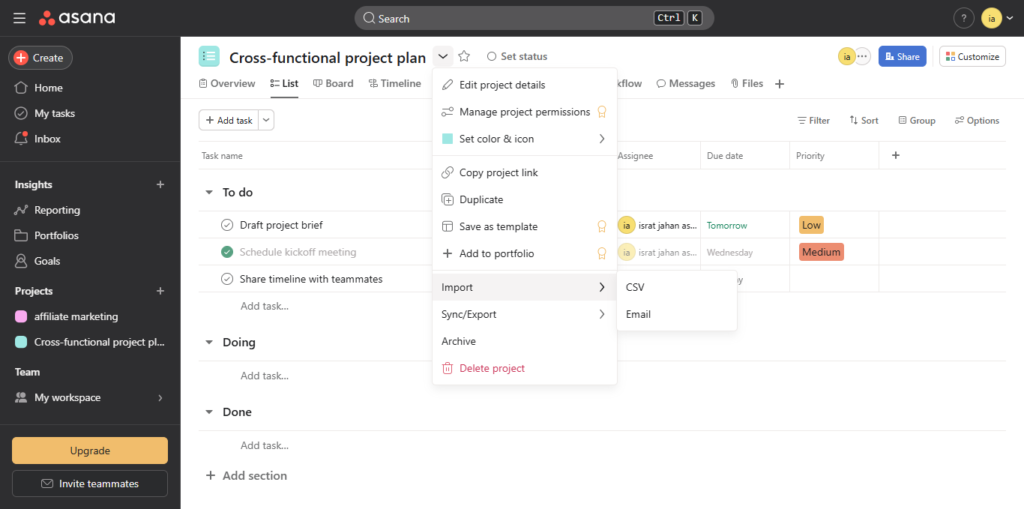
Go to the project you’d like to import tasks into, click the dropdown next to the project name, then go to the import section and select email.


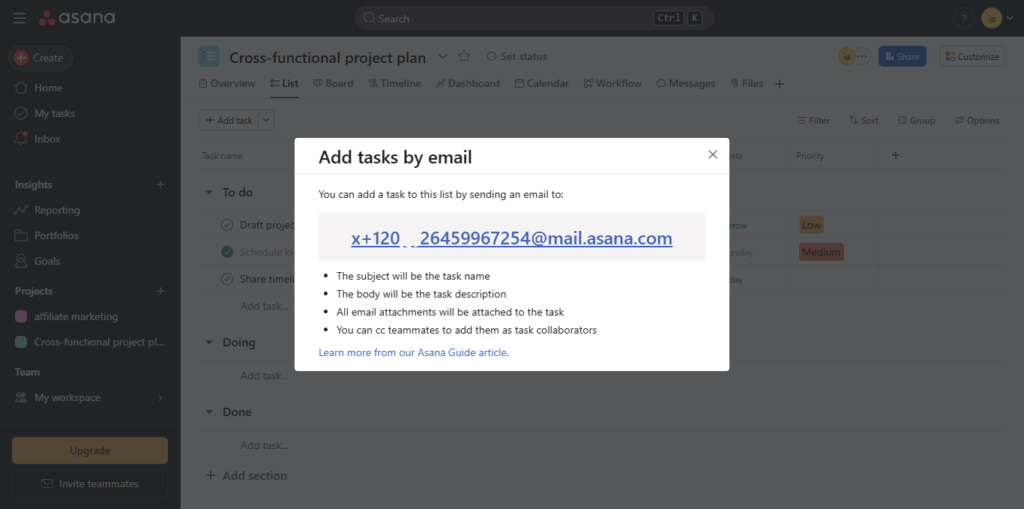
Here, you have the Project’s Unique Email address, and it will be something like this. Once you’ve created your email, post it to the project’s specific email in Asana.
Here’s an easy step-by-step tutorial on how you can create tasks in Asana via Gmail, Outlook, and Slack.
Such extensions make managing tasks easy by quickly translating email or Slack messages into task-oriented emails.
Email can also be used to comment on or update existing tasks in Asana. Here’s how:
Find the Task’s Unique Email Address: Asana provides unique email addresses for comments on each Task. You can locate it by navigating to the Task and selecting “Add via Email”.
Email to the Task’s Email Address: Make a note or update and send it to that unique email address. Your email will appear as a comment on the Task and can be used to provide periodic updates or extra information.
Include Multiple Projects: If you want a task to appear on more than one project, include the project names separated by commas in the subject line.” Marketing Campaign, Q4 Plan: Blog Post”.
Priority: You can place a priority tag in the email’s subject or body (e.g., “High Priority”) to prioritize tasks based on priority.
Attachments: If a support document is needed for the task, just add it to the email. Asana will automatically import these files into the Task.
Track Progress: When you add tasks to Asana, you can track them with Asana’s task-tracking features, which include creating custom fields, prioritizing, and navigating dependencies.
Sending tasks to Asana via email is a quick and efficient way to manage tasks without using the Asana app. Whether you’re on the go, from your inbox, or dealing with messages from others, this will enable you to turn emails into tasks quickly. Using the steps just above, you can list tasks, assign them, and organize your projects from your email.
Read more: “How to create an Asana form“
Now, use this functionality to streamline your work process and never leave a task unfinished!
To create an Asana task via email, simply compose a new email with the subject line as the task name and the body as the description. Send it to x@mail.asana.com, and it will automatically create a task in Asana.